A User Guide that goes step by step with images to explain how to do recurring payment set ups and tenant EFT
To enter a Tenant EFT data to a resident or roommate- Select Residential Tenant, Review Tenant. The Resident filter appears.
- Complete the filter, as needed, and click Submit. The Resident screen opens.
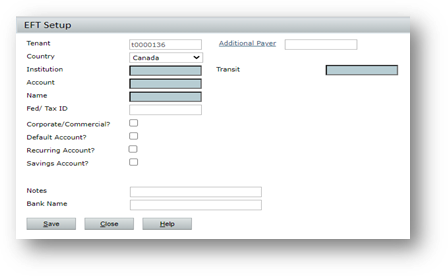
- On the Data menu, click EFT Setup (New). The EFT Setup screen opens.

- Click New. Additional fields appear.

- If you are adding a bank account record for a roommate:
- Click the Additional Payer link. The Additional Payer screen opens, showing any roommates who are linked to the resident.
- For the roommate who you are adding an account for, select the check box.
- Click OK. The Additional Payer screen closes. On the EFT Setup screen, the Additional Payer field displays the code for the roommate that you selected.
- Complete the screen as needed. For more information, see EFT Setup Screen Reference.
EFT Setup Screen Reference
Data Entry View:

EFT Setup Fields:
Transit: The routing number of the bank account that the tenant will use to pay charges. The routing number uniquely identifies the bank.
Account: The account number of the bank account that the tenant will use to pay charges.
Name: The name that the bank has on file for the bank account that you are adding a record for.
Fed /Tax ID: This field is not used with Payment Processing.
Corporate/Commercial: The bank account is a corporate or commercial account. Informational.
Default Account: The bank account is the payer’s default EFT account. Informational. You must select one of the bank account records as the default. Even if only one bank account record is entered for a payer, a default bank account record must be selected. Voyager automatically selects the first bank account record that you add as the default.
Recurring Account: Informational.
Additional Payer: An additional payer is a roommate. The Additional Payer field appears when you access the screen in one of the scenarios listed above.
Billing Contact: The Billing Contact field appears when you access the screen in Voyager Commercial.
Recurring Payment Setup
To set up a recurring payment for a resident or roommate
- Select Residential Tenant, Review Tenant. The Resident filter appears.
- Complete the filter, as needed, and click Submit. If you are setting up a recurring payment for a roommate, access the resident record of the resident whom the roommate is linked to. The Resident screen opens.
- On the Data menu, click Recurring Payment Setup. The Recurring Payment Setup screen opens.

- Select a tab as appropriate for the recurring payment or payments that you are setting up. Fixed payment: This option is intended for charges that are the same every month, such as rent charges. When you create a fixed payment, Voyager creates a receipt and an ACH or credit card transaction for the fixed amount indicated. Voyager creates the receipt for the fixed amount even if the actual amount of the charge or charges is lower or higher for a particular month. In these scenarios, Voyager creates a prepayment or there is a balance due on the tenant’s ledger. You can create multiple fixed payments in which each fixed payment is using a different bank account and/or credit card account. These different accounts can be owned by the same tenant or by a tenant and roommate(s).

Variable payment: This option is intended for charges that vary from month to month, such as some utility charges. When you create a variable payment, each month Voyager creates a receipt with a receipt amount that is the same as the charge amount for that month. If there are multiple charges selected in the variable payment then Voyager creates one receipt and one ACH or credit card transaction with a receipt amount that is the sum of the variable charges for that month. When you create a variable payment, you enter a percentage. The percentage feature is intended for scenarios in which roommates are splitting utility charges. If the tenant is not splitting a variable charge, you would enter 100% for the variable payment.
Lease charge: When you create a lease charge payment, Voyager creates a receipt and one ACH or credit card transaction for the amount of the selected lease charge or charges. Voyager uses the amount entered for the lease charge in the relevant record screen. For example, for commercial leases that are billed on the lease level, lease charges and amounts are entered on the Charge Schedules tab on the Lease screen. For residential leases, lease charges and amounts are entered on the Lease Charges tab on the Resident screen. If a lease charge for the current month is partially paid Voyager pays the unpaid balance from the lease charge.
- Click New. Depending on which tab is displaying, one of the following screens appears: Variable Recurring Payment Setup, Fixed Recurring Payment Setup, or Pay by Lease Charge Payment Setup.
- Complete the screen, as needed. For more information about the setup screen that you have accessed, see Various Data Entry Screens for Recurring Payment Setup Reference.
- Click Save. The screen updates to display the tab that you accessed in step 4. A row now appears in the tab for the recurring payment that you just created.
