General Ledgers can be a complicated, use REstack's real estate expertise to help you
Journal Entry
To create a journal entry batch
- Select G/L Create Journal Batch. The Batch Journal screen appears.
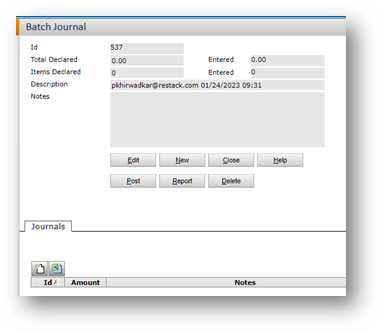
- Complete the top part of the screen (the batch header). If you are not using batch controls, you can leave everything blank and click Save. The Journals tab appears in the bottom of the screen.
- In the Journals tab, click the New Record button (the small white page)
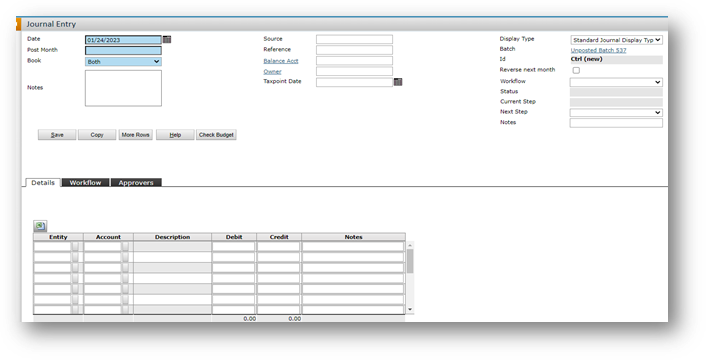
- Complete the screen.
- When you have entered all the JEs, return to the top part of the screen (the batch header). Adjust the Total Declared and Items Declared fields, if needed, and post the batch.
Reviewing and Editing Journal Entries
This procedure describes searching for individual journal records (posted journals). To find unposted journal entries, use the procedure for finding journal batches and select Open in the Batch Type field.
To review and edit journal entries
- Select G/L Review Journal. The Journal filter appears.
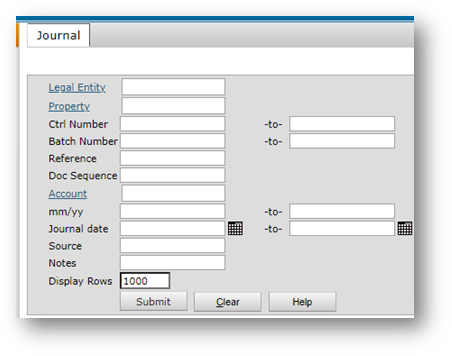
- Complete the filter and click Submit.
- The Journal screen appears.
Finding Journal Batches
In Voyager 7S, batch records are available after you post the batch. You can search for a particular batch and view the batch header as well as individual items in the batch.
To find journal batches
- Select G/L Find Journal Batches. The Journal Batch Filter screen appears.
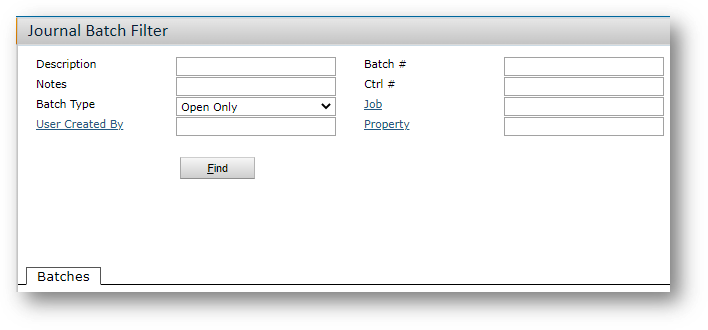
- Complete the top part of the screen.
- Click Find. Voyager displays the matching batches.
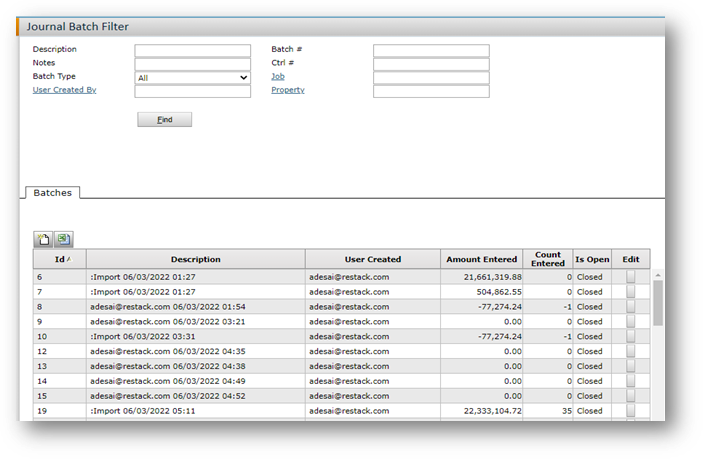
- To view a batch, click the Edit button. The Batch Journal screen appears (the batch header).
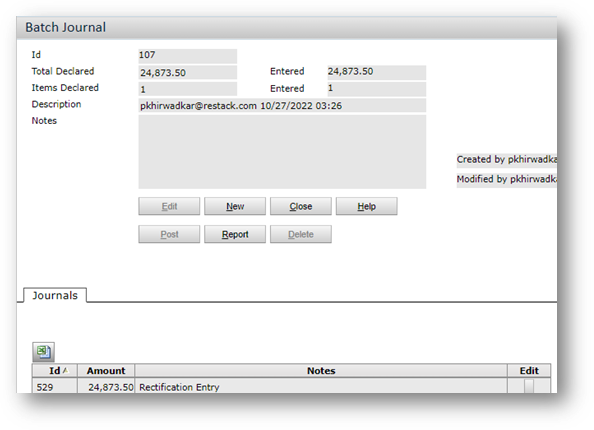
- In the Batch Journal screen, you can do the following:
-
- Drill down to individual records (for posted and unposted batches).
- Edit and post the batch (if it is unposted).
- Run the batch report (for posted and unposted batches).
To delete a line from an unposted journal entry
To delete a detail line from an unposted JE, set the amount to 0. (Leave the rest of the line as is.) Click Save. The line is erased from the screen.
Using the Reverse JE function
This function creates new, reversing JEs in a new batch. The Notes field references the original journal. Both the original JEs and the reversing JEs can be reviewed, giving a complete audit trail. You can only reverse posted JEs. (There is no need to reverse an unposted JE — you can just delete it, if needed.)
To reverse journal entries- Select G/LàReverse Journals.
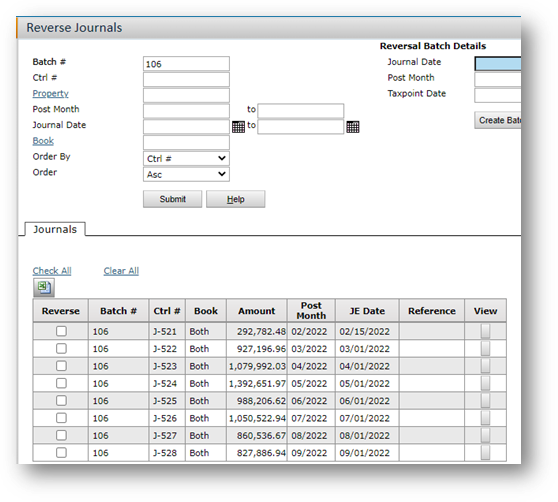
- The top part of the screen is a filter. Use it to find the JEs you want to reverse.
- Click Submit. Results appear in the bottom half of the screen.
- Select the JEs you want to reverse.
- Complete the Reverse Batch Details section of the screen as needed (the Journal Date and Post Month fields). For International users, there is an additional field: Tax point Date.
- Click Create Batch. Voyager creates and posts the batch.
Recurring Journal Entries
Adding Recurring Journal Entries
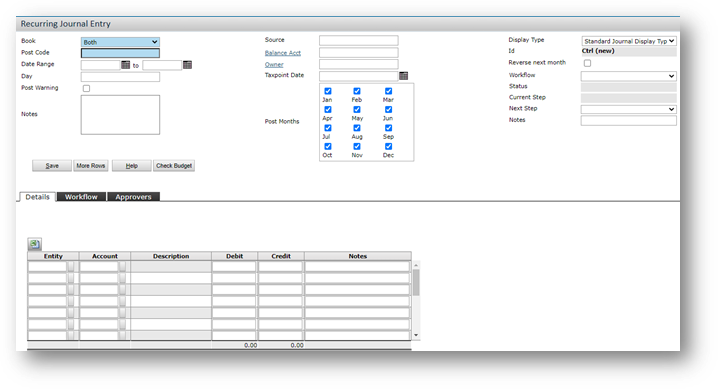
G/LàAdd Recurring Journal
Recurring journal entries are repetitive journal entries made periodically for a fixed amount.
When you add a recurring journal entry record to the database, you are adding a template. To create the actual journal entries, you post the recurring journal entry. This is typically done on a monthly basis, usually at the end of the month.
Most of the fields on the Recurring Journal Entry screen match those on the Journal Entry screen. (Recurring JEs use the same display types as regular JEs.)
Posting Recurring Journal Entries
Posting a recurring journal entry creates an unposted journal batch.
To post recurring JEs
- Select G/L Review/Post Recurring JE.
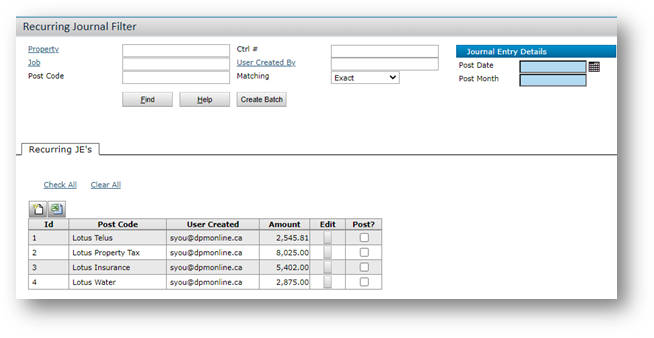
- Use the top of the screen as a filter. If you filter by Post Code, you can use the Matching field to select multiple journal entries with similar post codes. For example, you could post for codes 0011, 0012, and 0013 by typing 001 in the Post Code field and selecting Starts with in the Matching field.
- Click Find. Results appear in the bottom half of the screen.
- Select the Recurring JEs you want to post.
- Enter the Post Date and Post Month and click Post. If the Day field is defined on the Recurring Journal Entry screen, Voyager uses the month from the Post Month field and the day from the Day field on the Recurring Journal Entry screen. If the Day field is undefined on the Recurring Journal Entry screen, Voyager uses the day and month defined here.
End of Period Closing Procedures
Manual Close Property Option
If the Manual Property Close option is selected in Accounts and Options, properties can have different data-entry months, and each property’s month must be closed separately.
You can close the data-entry month for all transaction types at once or separately. If you close transaction types separately, you would typically close payables and receivables before journal entries.
If you use Manual Property Close, you still have to close the system operating month, in addition to closing each property.
If you use both the Manual Property Close and the Automatic Close Year options, Voyager automatically closes the year for each property when you close the last data-entry month of the fiscal year for the property.
Retained Earnings at Year End
As part of your year-end procedures, you should transfer current year retained earnings to prior year retained earnings. Use the Post Transfer function to do this, for cash and accrual books.
In the Yardi chart of accounts, retained earnings is a unique G/L account. It is a calculated value, the sum of income minus expenses. For example, if you receive 500.00 in rent to a property in a period and you pay 100.00 in expenses for that same property during that period, retained earnings equals 400.00.
If you don’t transfer prior year earnings to a separate account, the retained earnings account will not be accurate for the current year.
Closing Properties
To close a property
- Select G/LàEnd Period Close Property.
- Enter a property code or a property list code.
- Select the Function (the transaction type that you want to close the month for). Options are as follows: All, Receivable, Payable, Journal, Rec/Pay.
- Click Submit. The screen displays a grid that shows each property you are about to close and the current accounting month for different transaction types.
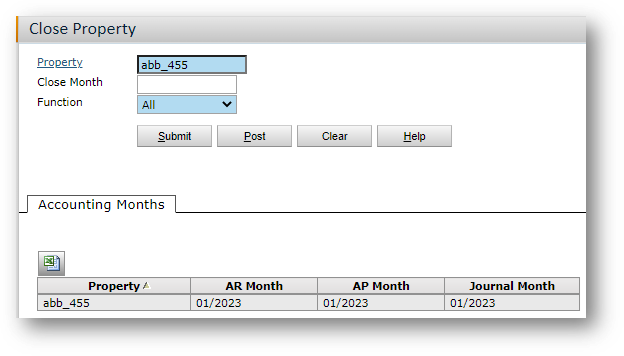
The months shown here correspond to the current accounting months shown on the Property Control screen. - Click Post. A warning message appears.
- Click Post again to confirm the action. In the grid, the months advance and display the new current accounting months. The new months are in red.
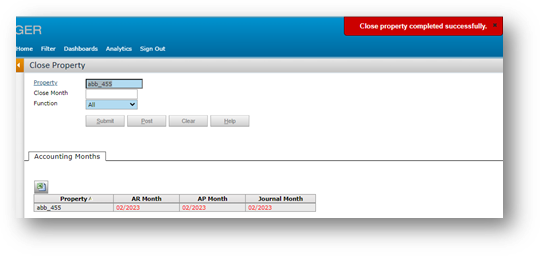
Close Month Field
If the Close Month field is left blank, each accounting period is moved forward a month.
If you complete the Close Month field, Voyager moves an accounting period forward only if it matches the close month you entered.
Closing Months
To close a month
- Select G/LàEnd Period Close Month. The Close Month screen appears.
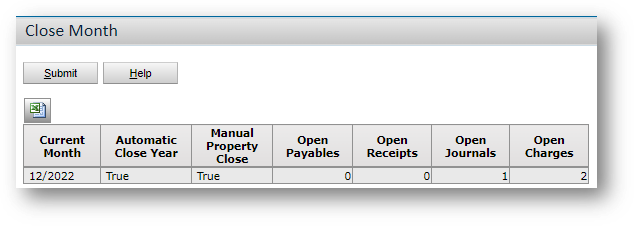
- The screen shows the number of open transactions. (The counts are for transactions in past months and the current month, not future months. “Open” means unposted.)
- Click Submit. A warning appears.
- Click Submit again to confirm. In the grid, the Current Month field is updated by one, to show the new current month.

The new current month appears in red.
Property Budgets
G/LàReview/Edit GL Budget
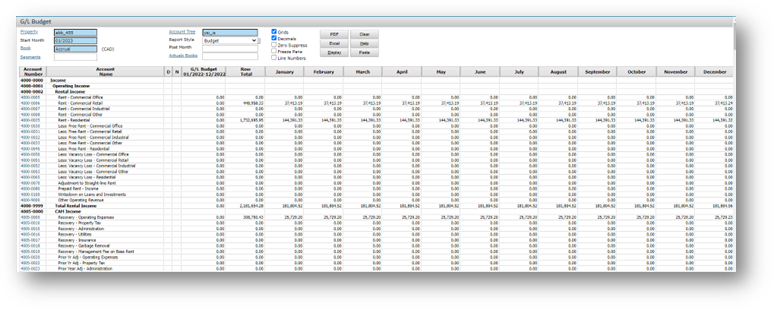
To set up a budget
- Complete the top part of the screen.
- Click Display. For each account, the screen displays the total for the year, and a figure for each month. Initially, the figures are all zeros.
- Click an account number link. The Budget Detail screen appears.
- In the Budget Detail screen, you can enter amounts manually, or you can enter a total for the year and click Distribute.
- To increase existing figures, you can enter a percentage and click Increase. (You can decrease existing figures by entering a negative percentage and clicking Increase.)
- To display the next or previous G/L account, click the right-arrow or left-arrow button at the top right of the screen.
- When you save and close the Budget Detail screen, the figures appear in the G/L Budget screen.
Exporting Budget Data to Excel and Re-Importing to Voyager (Using Copy and Paste)
You can export budget data from Voyager to Excel and you can import back to Voyager.
You can import a partial budget or an entire budget. You can also import data into a different budget in Voyager, enabling you to transfer data from one budget to another.
If you want to create a budget from scratch in Excel, we recommend that you start by exporting a blank budget from Voyager and then editing that budget in Excel. That will guarantee that the format is correct when you import the budget to Voyager.
To export and re-import budget data
- Open the G/L budget that contains the source budget data that you want to copy.
- If the budget displays line numbers, clear the Line Numbers check box on the G/L Budget screen and click Display again. Line numbers will interfere with the import process.
- Click the Excel button. A download file dialog box appears.
- Save the file on your local system.
- Edit the budget as needed in Excel.
- In Excel, copy the rows that you want to re-import to Voyager. (You can copy a partial budget, or the entire budget.)
- In Voyager, open the G/L budget in which you want to paste the budget data, if it’s not already open. (Enter the property/start month/book combination and click Display.)
- Click Paste. Voyager copies the budget data to the matching account numbers.
